For most printed photos, scan at 300 DPI if the goal is sharing or reprinting at the same size, and at 600 DPI if you want an archive copy or may enlarge the image later. Go to 1,200 DPI only for small originals, big enlargements or detailed retouching. Beyond those cases, a higher number mostly gives you bigger files, not better pictures.
This guide explains why those numbers work, what the archives and government agencies recommend, how to do the pixel math for a screen, and how to apply all of it when you are digitizing a school’s photo collection.
Touchstone-dsBring School Achievements to LifeTouchstone helps schools turn achievements and milestones into interactive digital displays that celebrate their history and connect their community.Explore Touchstone
TL;DR
- 300 DPI is enough for sharing online and for reprinting a standard 4x6 or 5x7 photo at its original size.
- 600 DPI is the safe archival setting, and the right one for any photo you might enlarge.
- 1,200 DPI is for small prints, large enlargements and detailed retouching. It is rarely needed otherwise.
- Resolution only means something next to the physical size of the original, so think in pixel dimensions, not just DPI.
- Raising a 72 DPI file to 300 DPI in an editor does not add detail. Only a new scan at a higher setting does.
Table of Contents
- A quick reference: which DPI for which job
- DPI, PPI and what “resolution” actually measures
- What archives and agencies recommend
- Should you scan at 600 or 1,200 DPI?
- Why the DPI number is not the whole story
- Resolution for screens and displays
- Can you change a photo from 72 DPI to 300 DPI?
- How to check the resolution of a scan you already have
- What this means for school photo collections
- Our perspective
- Put your scans on display
- Common scanning mistakes to avoid
- FAQ
- Sources
A quick reference: which DPI for which job
Here is the short version before we get into the reasoning. The figures come from the archival and photography guidance cited later in this article.
| Your goal | Original size | Suggested scan setting |
| Sharing by email or on social media | Any | 300 DPI |
| Personal archive of standard prints | 4x6 or 5x7 | 300 DPI at minimum |
| Enlarging to 8x10 or bigger | Any | 400 to 600 DPI |
| Institutional archive of prints | Any | 600 PPI |
| Very small prints (3x5) | 3x5 | Up to 800 PPI |
| Heavy retouching or large enlargement | Any | 1,200 DPI |
If you remember only one rule, make it this: scan once, at the highest setting you can reasonably store, and make smaller copies from that master. Rescanning old, fragile prints is the expensive mistake.
DPI, PPI and what “resolution” actually measures
You will see DPI and PPI used as if they mean the same thing. In scanning, they nearly do. The federal FADGI technical guidelines for digitizing cultural heritage define the spatial resolution of a scanned image in pixels per inch (PPI) and note that in common usage the two terms are interchangeable, with DPI better reserved for the dots a printer lays down.
So when a scanner menu says 600 DPI, it is sampling 600 points across every inch of your print, both horizontally and vertically.
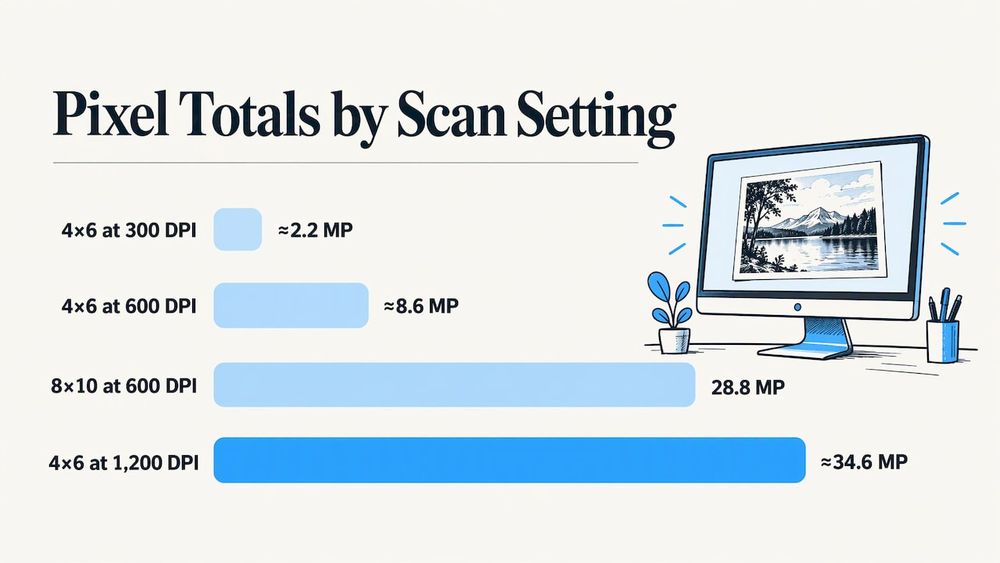
The number that matters most is the one you get when you combine that setting with the size of the original. The same FADGI guidelines give a clean example: an 8x10 inch photograph scanned at 100 ppi produces an image of 800 by 1,000 pixels, or 800,000 pixels in total. Resolution times physical size equals pixel dimensions.
Run the same math on a few common scans:
- A 4x6 print at 300 DPI becomes 1,200 x 1,800 pixels (about 2.2 million pixels).
- A 4x6 print at 600 DPI becomes 2,400 x 3,600 pixels (about 8.6 million pixels).
- An 8x10 print at 600 DPI becomes 4,800 x 6,000 pixels (28.8 million pixels).
- A 4x6 print at 1,200 DPI becomes 4,800 x 7,200 pixels (about 34.6 million pixels).
That last line is why 1,200 DPI is not a free upgrade. File sizes grow with the square of the setting, so doubling the DPI quadruples the pixels you have to store, back up and open.
What archives and agencies recommend
When you want a setting you can defend to a principal, a records committee or a donor, the published standards are the place to look. They agree more than they differ.
Library of Congress
The Digital Preservation division at the Library of Congress, in its guide to scanning personal collections, recommends 300 dpi for standard 4x6 and 5x7 photographs kept in a personal archive. For photos you intend to enlarge to 8x10 or bigger, it recommends 400 or 600 dpi.
State archives
State-level archives tend to set the bar a bit higher because they are preserving for decades. The State Historical Society of North Dakota’s digitization and scanning standard recommends 600 ppi for prints and photographs.
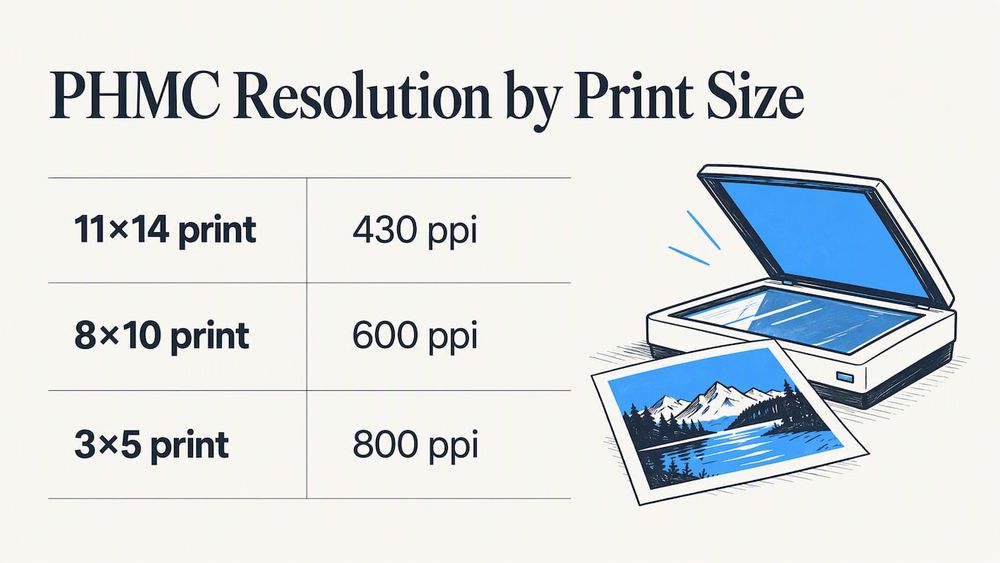
The Pennsylvania Historical and Museum Commission’s digitization guidelines tie the number to the size of the original: 430 ppi for an 11x14 print, 600 ppi for an 8x10 and 800 ppi for a 3x5. The logic is simple. A smaller original has to be sampled more densely to capture the same amount of information, which is why those guidelines treat the object’s size and the PPI together.
Federal records
Federal agencies work under a rule you can read yourself. According to 36 C.F.R. § 1236.50, permanent photographic prints with fine detail must be digitized at a minimum of 400 ppi, and higher resolutions may be needed when the detail is finer still.
A school is not a federal agency, so that rule does not bind you. It is still a useful benchmark: if the government’s floor for permanent records is 400 ppi, then a 600 DPI school archive is comfortably on the safe side.
Should you scan at 600 or 1,200 DPI?
For most people, 600. The common advice among genealogists and archivists is consistent: 1,200 DPI earns its keep in specific situations. Family Tree Magazine’s scanning tips suggest 1,200 dpi when you plan to print an enlargement or do detailed retouching.
Here is a practical way to decide.
- Is the original small (wallet size, 3x5, a cropped corner of a team photo)? Consider 800 to 1,200 DPI, because you have few square inches to work with.
- Will anyone print it larger than 8x10, or crop tightly into a face in a group shot? Use 600 DPI, or 1,200 for a very large print.
- Is the print sharp to begin with? If the original is soft or grainy, extra DPI mostly captures the softness in more detail.
- Do you have storage and time? A 1,200 DPI batch of a few thousand photos is heavy to scan, transfer and back up.
If you answer “no” to most of these, 600 DPI is your master setting.
Why the DPI number is not the whole story
A setting is a request, not a guarantee. FADGI notes that spatial resolution describes how finely pixels are spaced but does not by itself guarantee image quality. Scanner or camera performance and image processing also shape how much fine detail is actually rendered.
In practice, these factors decide whether your scan looks crisp:
- The scanner’s optics and sensor. A well-built scanner at 600 DPI can beat a weak one at 1,200.
- The condition of the original. Dust, fingerprints, curling and fading all show up in a scan, and the higher the DPI, the more clearly they show.
- Focus and flatness. A print that does not lie flat on the glass will be soft at the edges at any setting.
- Color and tone settings. Scan in color, even for black-and-white prints, and save a lossless master file.
- File format. Keep a master in a lossless format and make JPEG copies for sharing.
Clean the glass, wipe the print gently with a soft, dry, lint-free cloth, and let the scanner warm up before a long session. Those habits improve a scan more than a jump from 600 to 1,200 DPI will.
Resolution for screens and displays
If your photos are headed for a website, a slideshow or a touchscreen, you are working in pixels, not inches. The professional UPDIG guidelines state that resolution for display should be described by pixel dimensions, and that files with less than the optimum resolution will not deliver all the crispness an output device can reproduce.
That gives you a clean method:
- Find the pixel dimensions of the screen or the space where the photo will appear.
- Compare them with the pixel dimensions of your scan, using the math above.
- Make sure the scan has at least as many pixels as the largest size at which it will be shown.
Here is an example. If a photo will fill a large screen, a 4x6 print scanned at 300 DPI gives you 1,200 x 1,800 pixels, which may be stretched thin on a big display. Scanned at 600 DPI, the same print gives 2,400 x 3,600 pixels, which leaves room to crop and zoom. That headroom is the practical argument for a 600 DPI master when the destination is a large screen.
For print, the targets are different. The ASMP Digital Photography Guide says resolution only matters in relation to output size, and recommends 180 to 360 ppi for inkjet printing and 240 to 400 ppi for continuous-tone printing, as laid out in its digital photography guide. To print an 8x10 at 300 ppi, you need 2,400 x 3,000 pixels. A 4x6 scanned at 600 DPI has 2,400 x 3,600, so it just covers that.
Can you change a photo from 72 DPI to 300 DPI?
You can change the number, but you cannot create detail that was never captured. The pixel count is what you actually own.
The Iowa State University Extension digital imaging fact sheet explains how this works in Photoshop. In the Image Size dialog, with resampling turned off, changing the width or height changes the resolution value but leaves the total pixel dimensions untouched. A 3,000 x 2,000 pixel image labeled 72 PPI becomes 300 PPI with a smaller print size, and the same pixels are simply spread over fewer inches.
If you turn resampling on, the software invents new pixels by guessing from neighbors. That can make the image look soft, and it is no substitute for scanning again at a higher setting.
The takeaway: if a file is too small for its purpose, go back to the print and scan it again at 600 DPI. If you no longer have the print, keep the file at its native size and show it at a size it can support.
How to check the resolution of a scan you already have
Before you decide to rescan anything, find out what you have. The pixel dimensions tell you more than the PPI label.
- Photoshop: open the image and choose Image > Image Size to see width, height in pixels and the PPI value, as the Iowa State fact sheet describes.
- Windows: right-click the file, choose Properties, then the Details tab to see dimensions and resolution.
- Mac: open the file in Preview and choose Tools > Show Inspector to see pixel dimensions.
Then do the reverse math. Divide the pixel width by the inches of the original. A file 1,200 pixels wide from a 6-inch-wide print is a 200 PPI scan. A Holy Cross library guide on digital images shows the same relationship in the other direction: pixel dimensions are the product of resolution and physical size.
What this means for school photo collections
Schools sit on some of the most valuable print collections in a community: team photos, graduation classes, band and drama programs, trophy presentations and yearbook candids. Many are one-of-a-kind, and many are small, faded or mounted in albums.
A few rules of thumb for a school project:
- Scan the master at 600 DPI. It meets the archival guidance above, supports cropping into group shots, and gives you pixels to spare for large displays.
- Use 800 to 1,200 DPI for small prints, such as wallet-size portraits or 3x5 snapshots.
- Name files consistently (year, event, and any names you know) and record who is pictured while someone still remembers.
- Keep the originals. A scan is a copy, and a better scanner may come along.
- Back up in at least two places.
If your photos live inside bound yearbooks, the approach changes, since the book cannot lie flat on a scanner glass without risk. Our guide on how to digitize old yearbooks walks through that process, and the yearbook scanning page explains how we handle it. For the bigger picture of organizing what you scan, see our advice on archiving high school memories and photos and on building an online high school digital archive.
Our perspective
We build digital Halls of Fame, record boards and archives for schools, so we see what happens to a scan after it leaves the scanner. It ends up on a big screen in a hallway, in front of students, alumni and families who linger over faces they recognize.
That is why we nudge schools toward a 600 DPI master. A scan made for an email attachment can look fine on a laptop and fall apart when it is shown large. A scan with room to spare can be cropped to a single athlete in a team photo and still look sharp.
Resolution is only one part of recognition. Our displays are designed with Emmy-nominated UI/UX design, by designers with a gaming industry background, so that a well-captured photo is presented the way it deserves. The scan is the raw material, and the display is where the pride shows up.
If you are planning a recognition project, scan first, scan once, and scan generously. Everything you build afterward gets better.
Gardner Gendron
Put your scans on display
Once your photos are digitized, they should be seen, not stored on a shared drive. We design fully customizable, brand-integrated interactive touchscreen displays for schools and universities, covering the Hall of Fame, athletic records, donor recognition and archives.
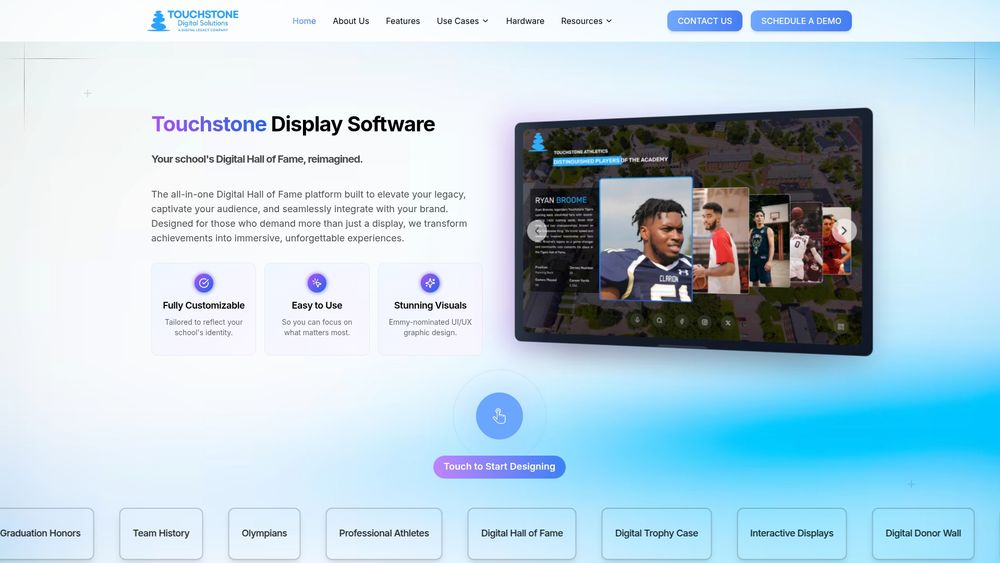
Our wall-mounted and floor-standing touchscreen bundles are published at $3,100 to $4,900 for the wall-mounted bundle and $3,550 to $4,300 for the floor-standing bundle, as one-time purchases. If you want to see how scanned photos become a living tribute to your athletes and graduates, start with our Digital Athletic Hall of Fame or explore the full platform at Touchstone Digital Solutions.
Common scanning mistakes to avoid
A few errors cause most of the regret in photo digitization projects.
- Scanning at 72 DPI because it matches what a screen “needs”. You lose the option to enlarge or crop.
- Scanning at the maximum setting for everything. Files balloon, and the scanner’s top setting is often interpolated, not true optical resolution.
- Saving only a compressed JPEG. Keep a lossless master and make copies from it.
- Skipping the cleaning step. At higher DPI, dust becomes obvious.
- Forgetting the back of the photo. Handwritten dates and names are often the most valuable information on it, so scan the back when there is writing.
- Resampling to hit a target. As covered above, it changes the numbers without adding information.
FAQ
What is the best DPI for scanning photos?
For most photos, 600 DPI is the best all-around master setting. The Library of Congress recommends 300 dpi for standard personal-archive prints and 400 to 600 dpi for photos you may enlarge. Use 300 DPI when you only need to share or reprint at the original size.
Should I scan photos at 600 or 1,200 DPI?
Choose 600 DPI unless you have a reason for more. Genealogy guidance points to 1,200 dpi for enlargements or detailed retouching, and small prints can benefit from it too. For an ordinary 4x6, the extra pixels mainly add file size.
Can I change a photo from 72 DPI to 300 DPI?
You can change the label, but not the detail. With resampling off, the pixel dimensions stay the same and only the print size changes. Turning resampling on invents pixels and can soften the image, so rescan the original when you need more detail.
How do I tell the resolution of a photo?
Check the pixel dimensions first. In Photoshop, use Image > Image Size. On Windows, open the file’s Properties and then the Details tab. Divide the pixel width by the original’s width in inches to get the effective PPI.
What resolution do I need for a photo shown on a display?
Displays are measured in pixels, so match the scan’s pixel dimensions to the largest size the photo will appear. A 600 DPI scan of a 4x6 print gives 2,400 x 3,600 pixels, which leaves room to crop and zoom on a large screen.
Sources
- Library of Congress: Scanning Your Personal Collections
- State Historical Society of North Dakota: Digitization/Scanning Standard
- Pennsylvania Historical and Museum Commission: Digitization Guidelines for Textual and Graphical Records
- 36 C.F.R. § 1236.50: Requirements for Digitizing Permanent Records
- Family Tree Magazine: 10 Steps for Scanning Your Genealogy Files and Family Photos
- FADGI: Technical Guidelines for Digitizing Cultural Heritage Materials
- Holy Cross Libraries: Understanding Digital Images
- ASMP Digital Photography Guide
- Iowa State University Extension: Digital Imaging Fact Sheet